

Hello everyone! A while ago I posted my Eras Tour quilt on Reddit and have been blown away by the positive feedback. Many have asked for a pattern, I was okay with sharing but revising the pattern also showed me the line-work could be heavily improved, especially as I modified a lot since making the original quilt. Some changes were made, but I will try my best to also share how I did some steps, and also variations of what you can do. Some of you wanted to pay for the pattern which I’m grateful for. I wanted this one to be free of charge, but donations are welcome at Ko-Fi.
I was the only tester and drafter and tried to make the pattern as logical and fault-free as possible, but if you have feedback or questions, feel free to message or comment. I unfortunately can’t explain the basics of FPP (Foundation Paper Piecing), so experience with FPP is recommended. Still working on this blog post as it feels a little incomplete, please bear with me! The bare minimum information is here though 🙂
Size of 12 blocks together: 36” x 48” / 91,5cm x 122cm
12 blocks with text: 36” x 60” / 91,5cm x 152.5cm
Full quilt size can be adjusted due to sashing.
My Youtube video about the quilt is more a process video and not intended to be a tutorial, but may help visually with all the steps.
Printing
This pattern is slightly smaller than my quilt, as I wanted to make the blocks 12 inch (13 inch originally) to keep it universal and even future-proof to make exchanging eras pictures potentially possible. There are NO seam allowances in this pattern so keep your ¼ ruler handy!
The PDF file is converted to US Letter.
But no worries for A4 users (like I am), you can either change the printer settings to US letter to keep the original size and have slightly smaller margins to tape the pattern together, or just print the file on A4 with A4 settings, this will make the quilt slightly smaller!
After printing the files, tape the pattern together. I didn’t number the pages, but there should be enough lines to find connecting points. You can either tape it with a sewing machine friendly method (glue stick, painters’ tape) and use the pattern as the one you sew through, or trace the pattern to add seam allowances or to reuse the pattern again in the future.
Fabrics
Unfortunately I don’t have proper numbers on the yardage as I used a lot of fabric remnants and my fabric store has a relatively high minimum cutting amount. The amount of fabric also depends if you are going for novelty fabrics or not, whether you can overlap color schemes (I could for folklore&reputation and evermore&fearless) or if you’d like to change the overall color scheme. These are estimations and overall notes:
Eras A 12×12” (30x30cm) piece for each color should be enough for the majority of the colors, for many colors you may need even less. I do recommend a bit more for the shade that serves as both face and background. I drafted pretty big piecing blocks, feel free to use scraps to make up the bigger blocks. For Midnights count twice to triple.
Black About 15”x39” / 35cmx100cm for the bottom text, a little more for the blocks.
White About 39”x60” / 100cmx150cm for sashing, a little more for the blocks.
Paper-y double sided interfacing I used Vlieseline’s Vliesofix. About 15”x39” / 35cmx100cm for the bottom text, a little more for facial features.
Novelty fabrics Completely optional, a very small part of each block, take nap/prints into account. If not using novelty fabrics, increase fabric for the Eras blocks.
I will be referring to the blocks as their respective albums, so here is a quick overview for those unfamiliar with her discography, as well as a summary of colors/novelty fabrics. Here’s also my intended color palette, though I had to change some of the colors due to availability.

Debut (2006) green shades, used printed cotton, intended to have viscose. The guitar strap and guitar could also be replaced with different fabrics.
Fearless (2008) yellow shades, used linen, created ruffles under the shoulders.
Speak Now (2010) purple shades, was only a small shoulder strap so used regular colors.
Red (2012) red shades, used lace.
1989 (2014) light blue shades, used sequins
Reputation (2017) black/grey shades, used velvet, intended teddy or faux fur.
Lover (2019) pink shades, used velvet, intended teddy or faux fur.
Folklore (2020) grey shades, used plaid
Evermore (2020) brown/beige shades, used plaid.
Midnights (2022) dark blue/grey shades, used lace for the top, ribbed corduroy for pants.
Preparing for piecing
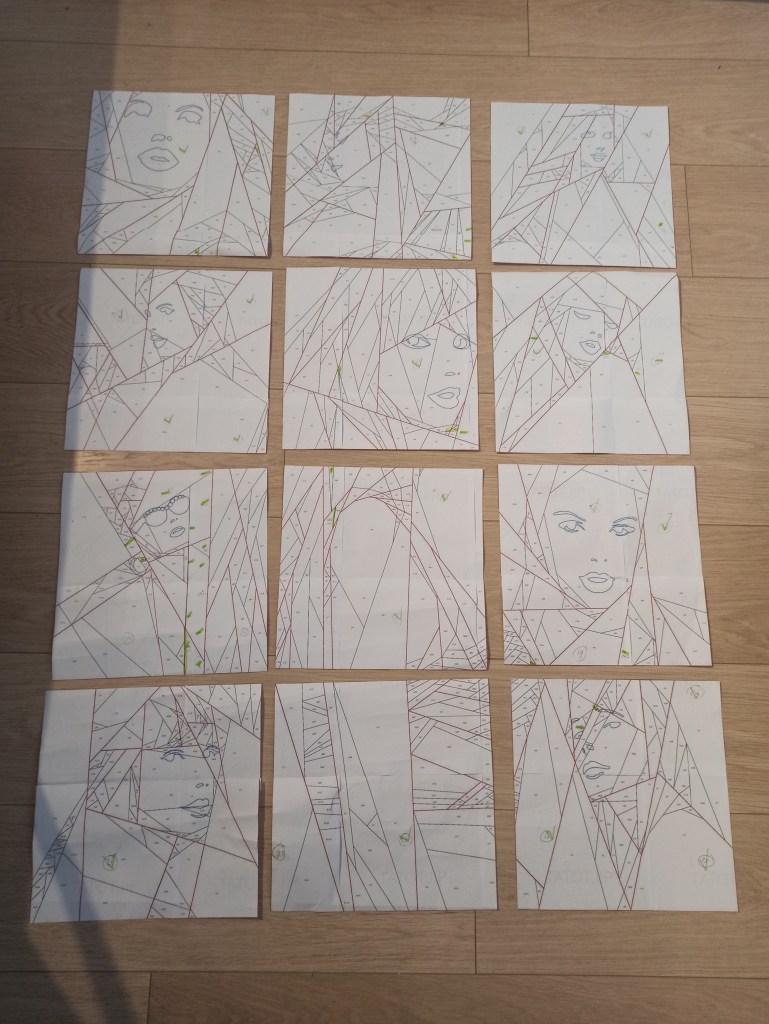
This pattern was drafted as 12 blocks, so when you’ve taped the full pattern, cut it into the 12 blocks. I recommend working on them one by one due to the color marks, also due to different difficulty levels. The bottom text is optional to include, if you’re keeping it, cut this off but keep intact for placement later on.
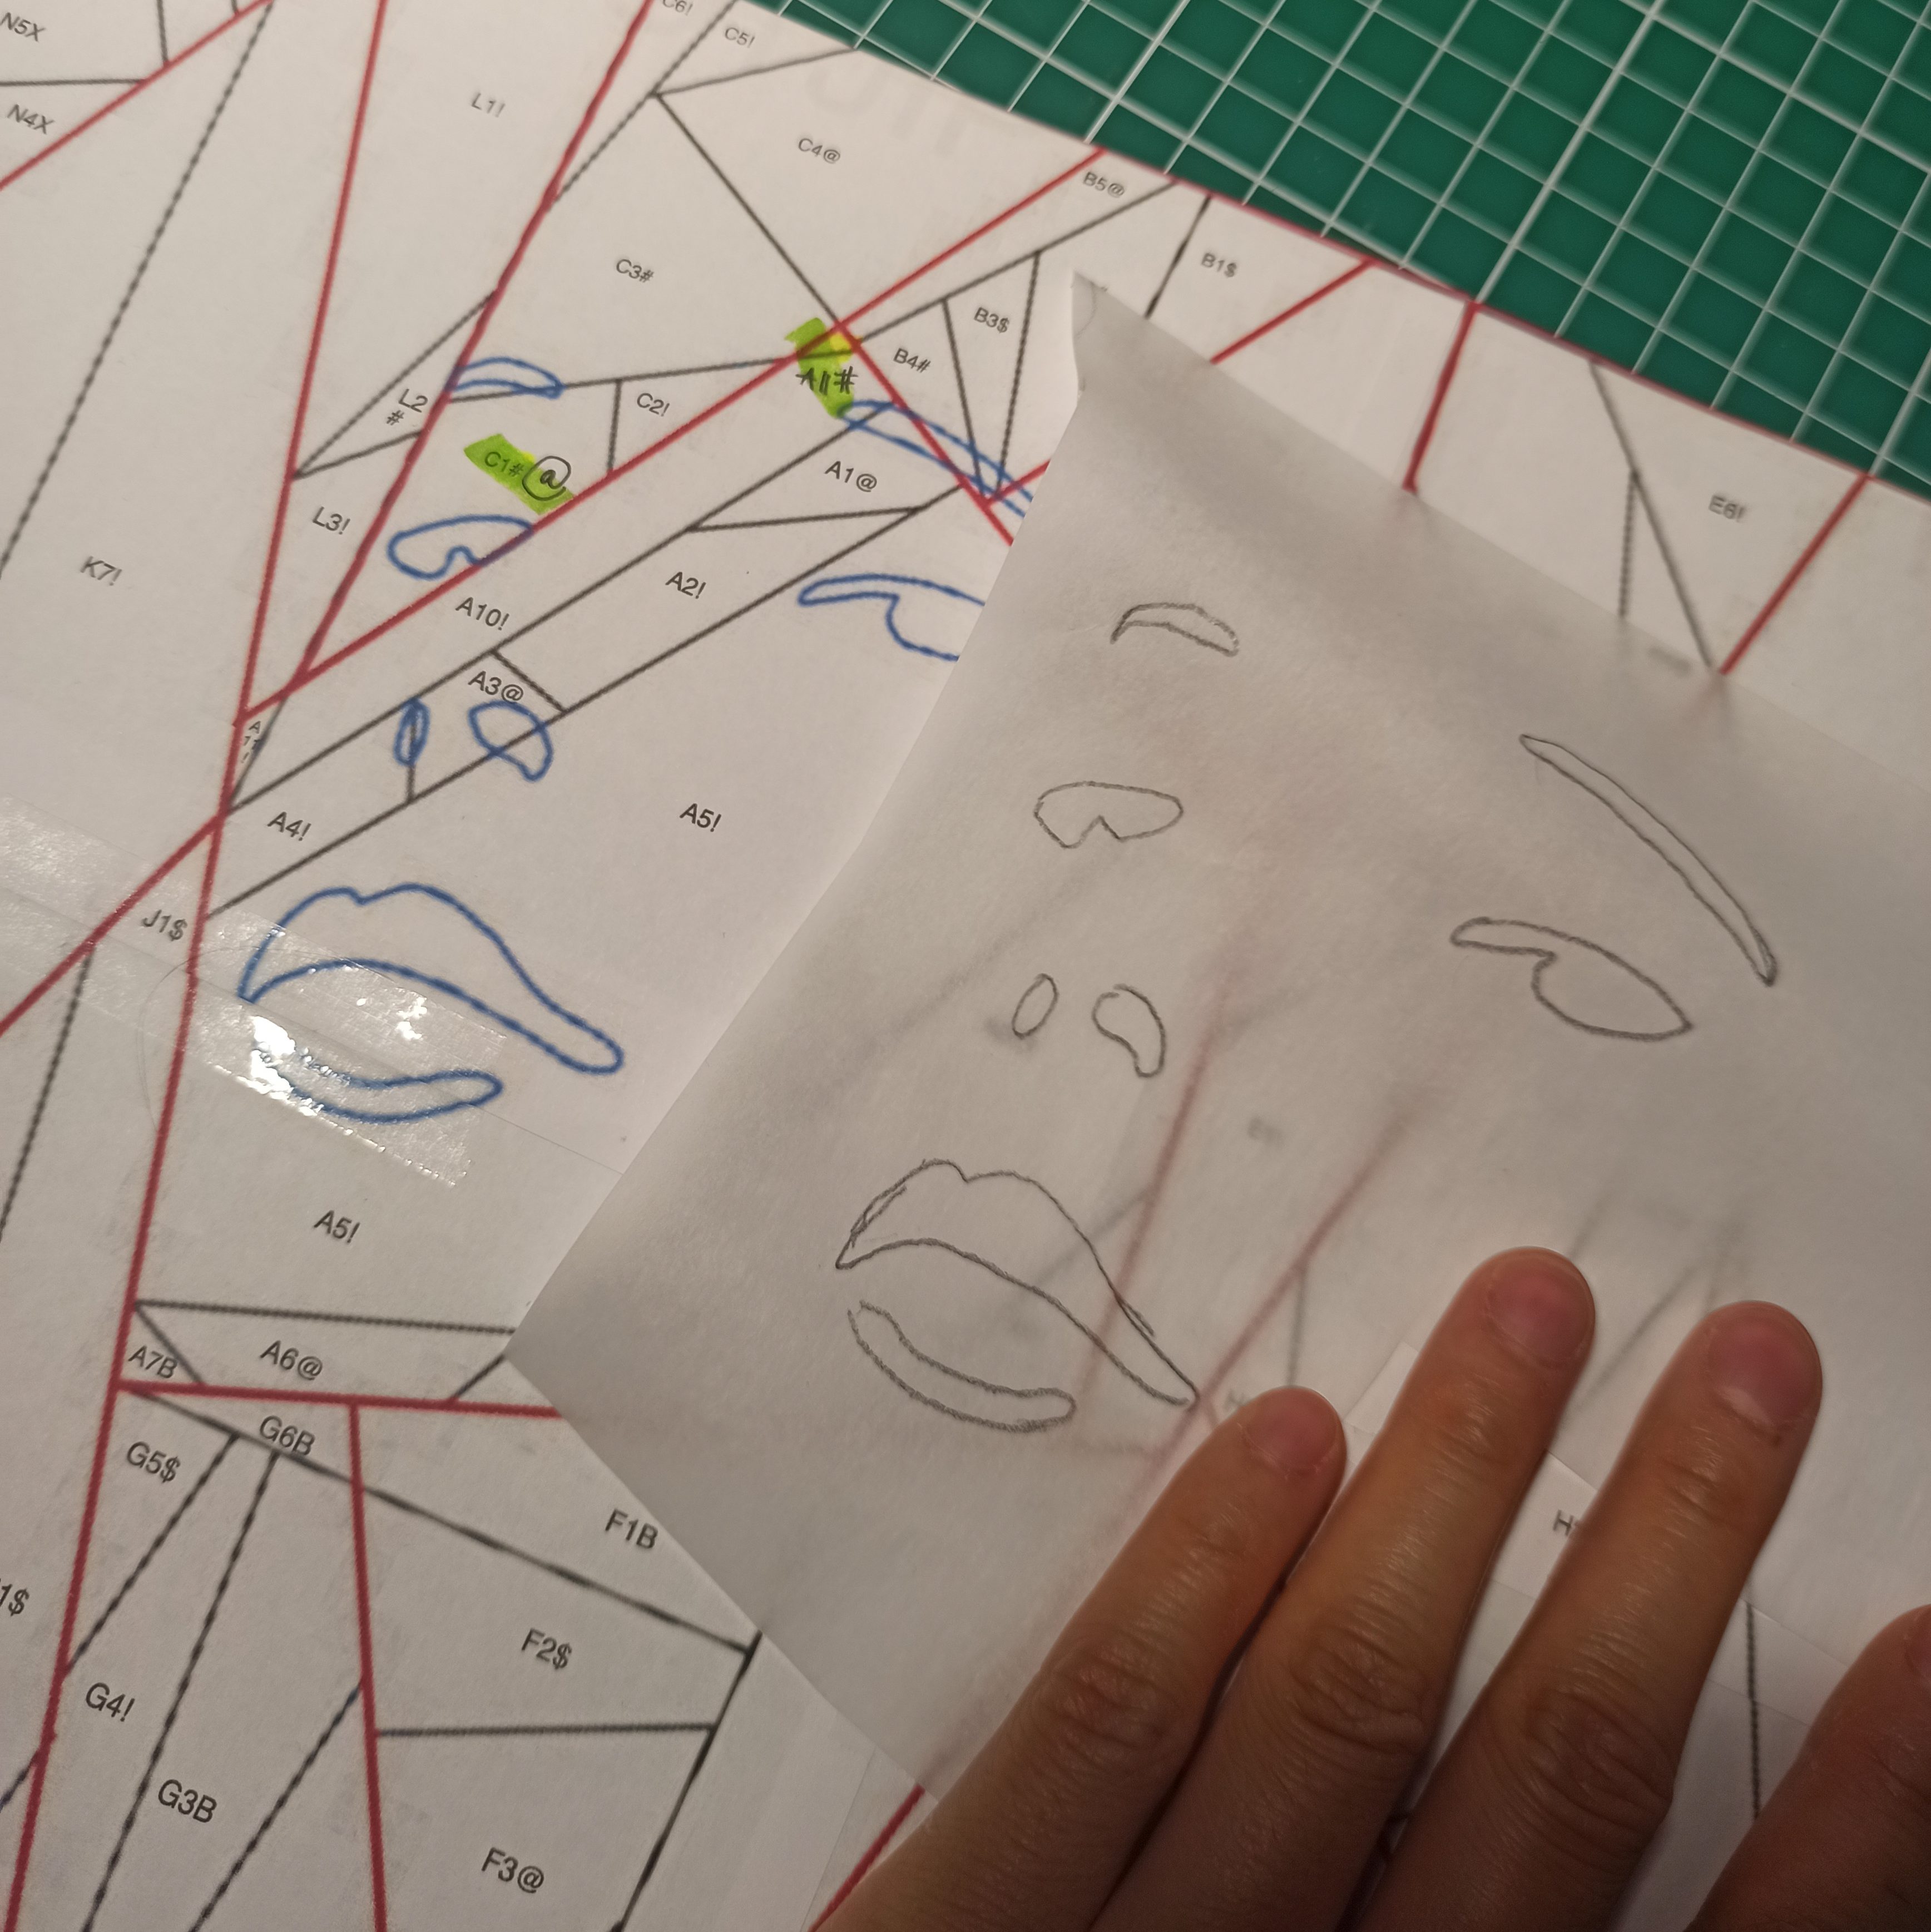
I decided to give her the facial features and bottom text using raw edge applique as this is ‘just’ a wall-hanging, so not sure how these will last through a wash. If you’d also like to use applique, use this moment now to trace the blue lines using double sided fusible interfacing and set this aside for later. Feel free to embroider or leave out instead.
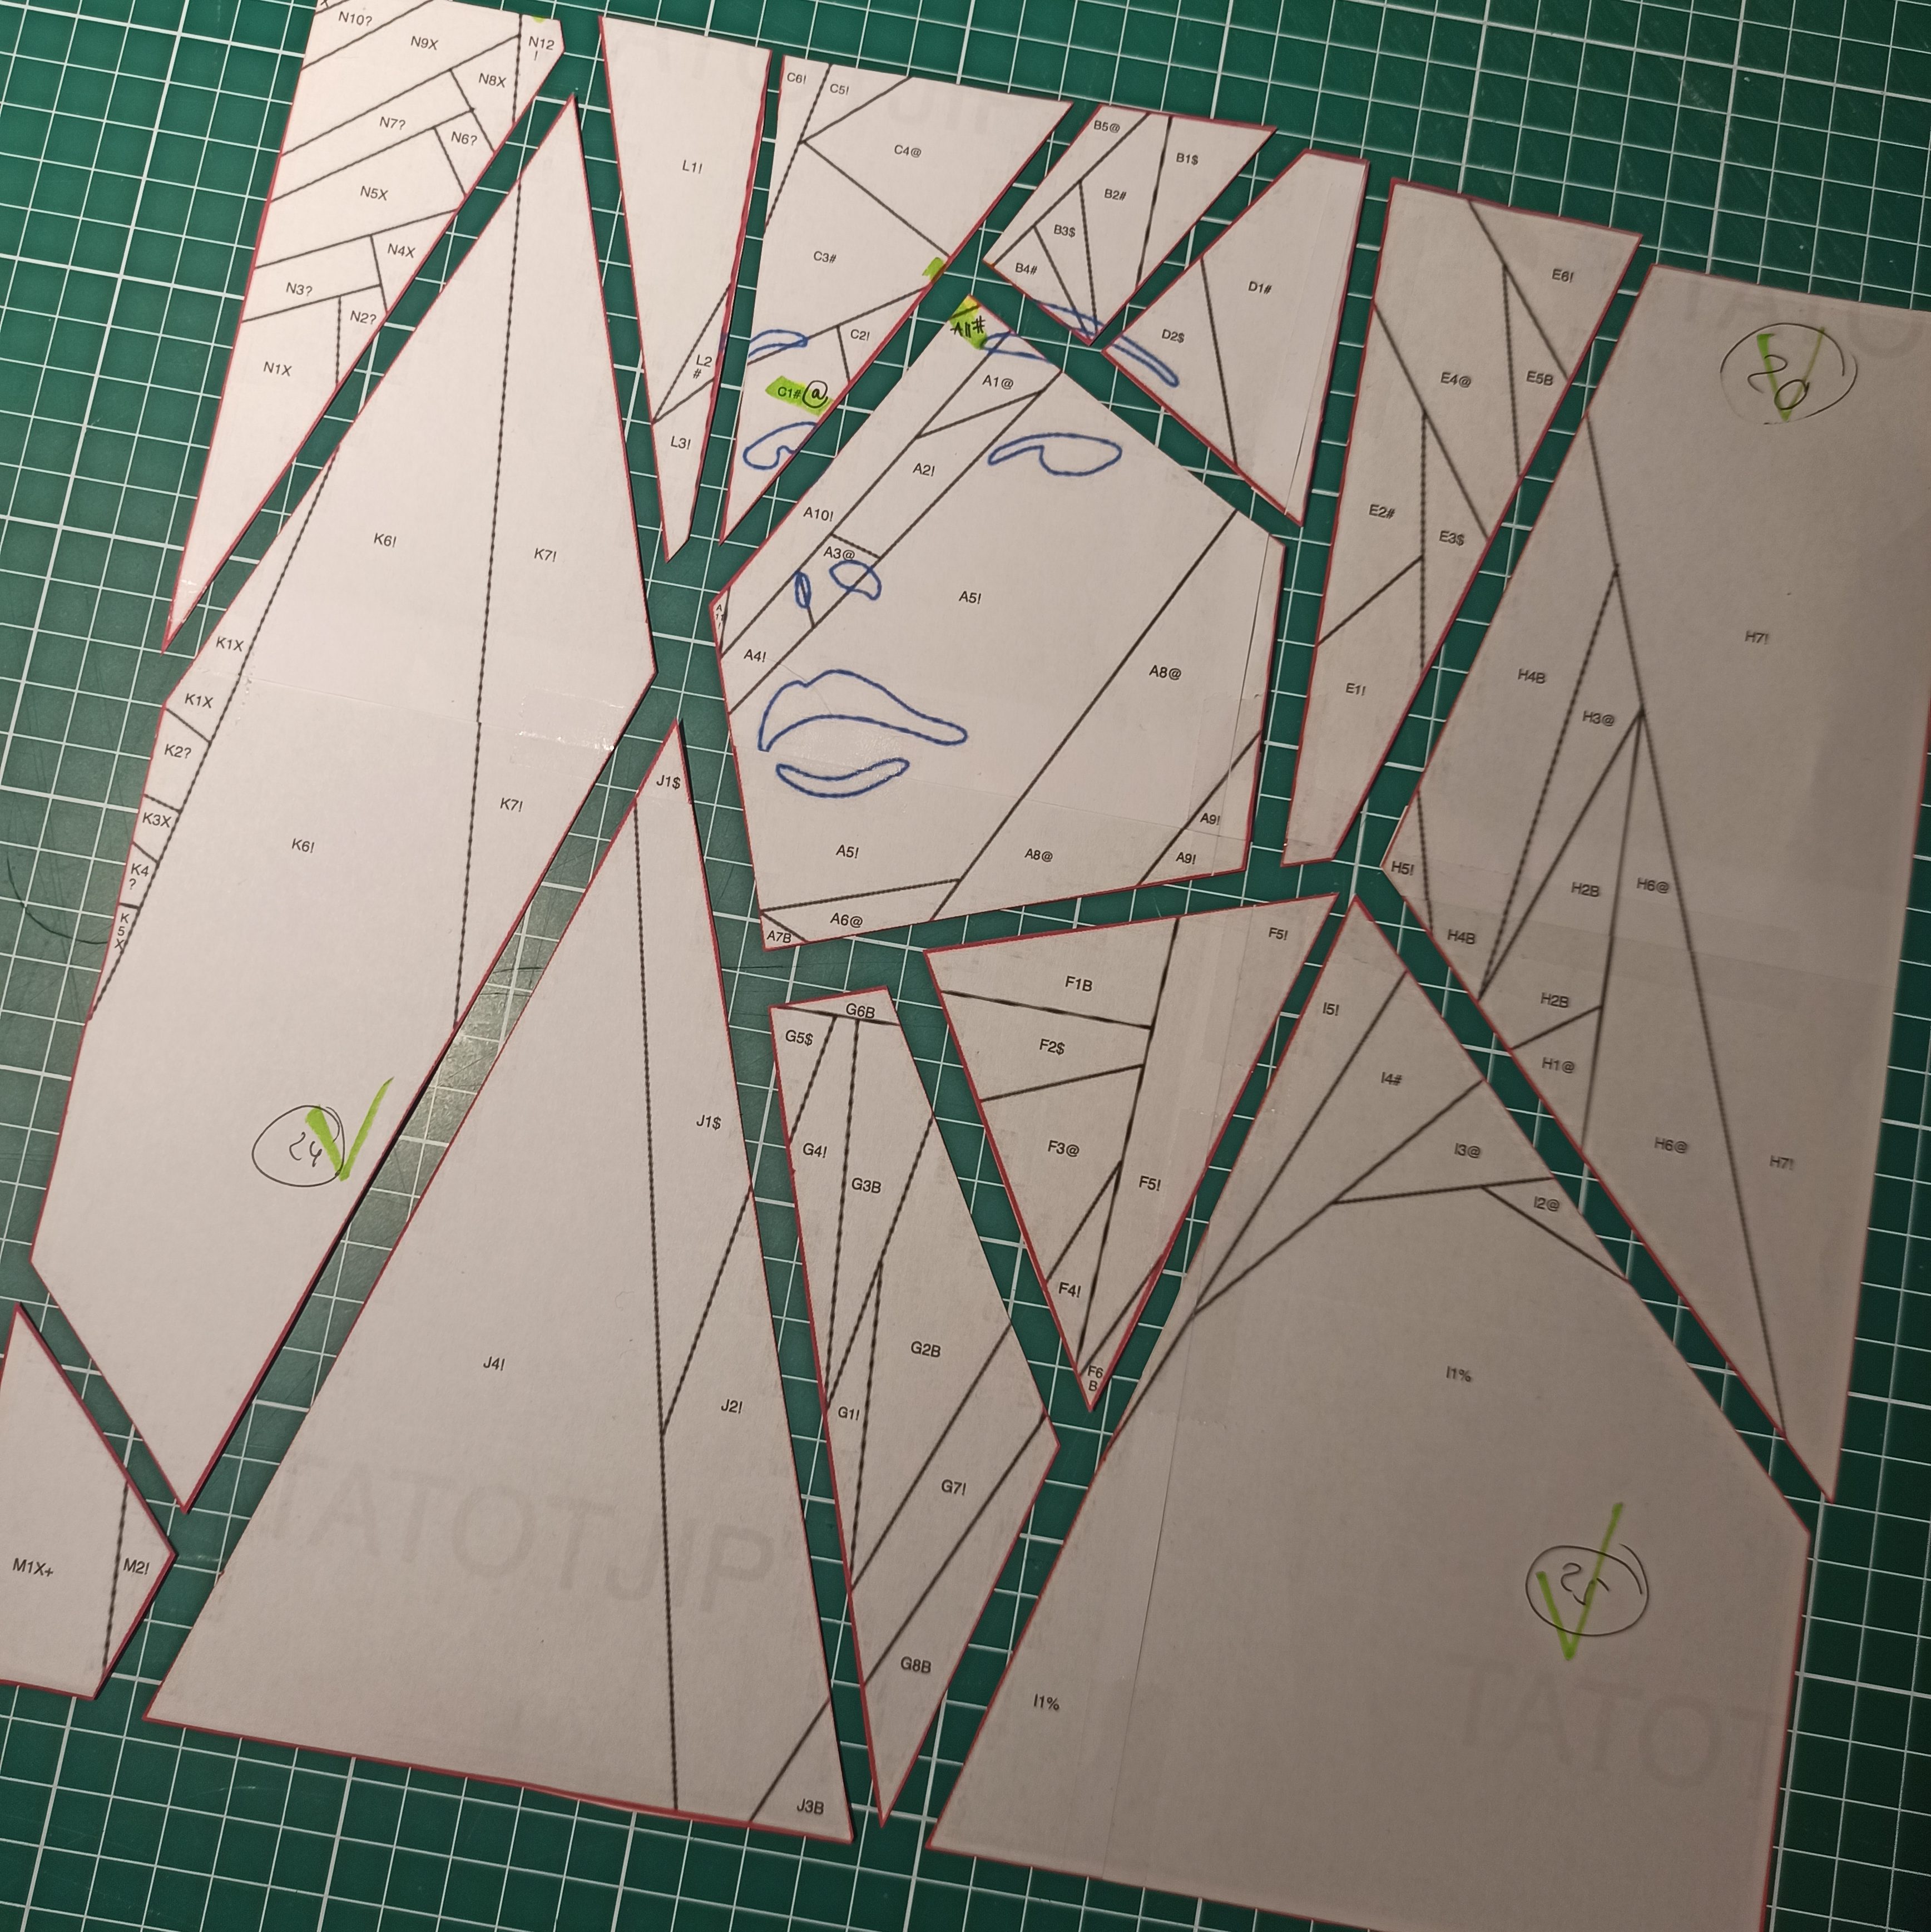
When you start with a block, cut the red lines to create sections to work on.
PERFECTIONIST NOTE – I somehow drafted the blocks on the left side (Debut, Red, Reputation, Folklore) ⅛ / 3mm short. If this bothers you, you can draw a new border and extend the lines on the side. Apologies for the inconvenience!!
Piecing (how to read the pattern)
The pattern is filled with codes such as A3%, G2&, B6^ etc.
The first character represents the section using letters (this is also divided by red cutting lines)
The second character counts the order of piecing.
The third character represents the colors. They are kinda in order of keyboard characters so you can also translate them to 1234.
The Eras color characters repeat with every block, which is why I recommend piecing the blocks one by one.
! Eras shade 1 (light)
@ Eras shade 2
# Eras shade 3
$ Eras shade 4 (dark)
% Eras novelty fabric representing clothing, can also be replaced with other shades
The 3 Midnights blocks also spill over to the Eras blocks, so they get their own set of characters.
^ Midnights shade 1 (light, I wanted very light grey but ended up using white)
& Midnights shade 2
* Midnights shade 3
? Midnights shade 4 (dark)
X, X+ Midnights novelty fabric, X can be replaced with ^, X+ can be replaced with ?.
B Black
W White
Assembly
I try to pin as much as possible before sewing/pressing, so I’ll be transcribing these moments as ‘rounds’, after every round, sew and press. The easiest blocks are Speak Now, Reputation and Red, consider starting there if you are still getting used to FPP, obviously if you have more experience with FPP, you may find an easier route than following my chart.
Debut
Round 1: P+Q, C+D+E+F, H+I, M+N
Round 2: PQ+CDEF, HI+G+J, MN+L
Round 3: B+CDEFPQ+GHIJ, K+LMN
Round 4: BCDEFGHIJPQ+O
Round 5: A+BCDEFGHIJOPQ+KLMN
Fearless
R1: A+B+C, D+E, F+G, I+J, Q+P+R, N+O, L+M
R2: DE+FG, H+IJ, LM+NO
R3: ABC+DEFG, HIJ+K,
R4: ABCDEFG+HIJK
R4: ABCDEFGHIJK+LMNOPQR
Speak Now
R1: C+A+B, F+G, I+J, K+L
R2: ABC+D, IJ+KL+N
R3: ABCD+E, IJKLN+M
R4: ABCDE+FG
R5: ABCDEFG+H
R6: ABCDEFGH+IJKLMN
Red
R1: B+A+C, F+I, J+K
R2: D+ABC+FI, JK+L
R3: G+ABCDFI+E
R4: H+ABCDEFGI+JKL
1989
R1: C+D, E+F, I+J, L+M+N, P+O
R2: A+CD, EF+G, H+IJ, K+LMN
R3: ACD+B, KLMN+OP
R4: ABCD+KLMNOP
R5: ABCDKLMNOP+HIJ
R6: ABCDHIJKLMNOP+EFG
Reputation
R1: B+C, H+G+F, K+L
R2: A+BC, J+KL
R3: ABC+D
R4: ABCD+E
R5: ABCDE+FGH
R6: ABCDEFGH+I
R7: ABCDEFGHI+JKL
Lover
R1: B+C, E+F, G+H, I+J, L+M+N
R2: D+BC+A+IJ, EF+GH, K+LMN
R3: ABCDIJ+EFGH, KLMN+O
R4: ABCDEFGHIJ+KLMNO
Folklore
R1: B+D, C+L, F+G, H+I, K+M+N
R2: A+BD, KMN+J
R3: ABD+CL+E
R4: ABCDEL+FG
R5: ABCDEFGL+HI
R6: ABCDEFGHIL+JKMN
Evermore
R1: B+C, D+E, K+L+M, O+P+Q
R2: A+BC, DE+G, I+KLM
R3: DEG+F, ABC+IKLM
R4: J+ABCIKLM+OPQ, DEFG+H
R5: ABCIJKLMOPQ+DEFGH
R6: ABCDEFGHIJKLMNOPQ+N
Midnights 1 (face)
R1: A+B+F+E, K+J, M+N, I+H+G+D
R2: C+ABEF+JK, L+MN+O
R3: ABCEFJK+LMNO
R4: ABCEFJKLMNO+DGHI
Midnights 2 (shoulder) There’s no H due to last-minute pattern changes!
R1: A+J+B, L+M, P+O, R+S, V+U
R2: ABJ+I+C, K+LM, PO+N, RS+Q, T+VU
R3: ABCIJ+D, KLM+NOP, QRS+TUV
R4: ABCDIJ+E
R5: ABCDEIJ+F+KLMNOP
R6: ABCDEFIJKLMNOP+G
R7: ABCDEFGIJKLMNOP+QRSTUV
Midnights 3 (waist)
R1: A+B+C, H+I+J, G+F+E
R2: HIJ+K+EFG+D
R3: ABC+DEFGHIJK
Finishing quilt top
Note: Did not take blocking into account.
Sew the blocks together in thirds.
R1: Debut+Fearless+Speak Now, Red+Reputation+Folklore, 1989+Lover+Evermore, Midnights 1+2+3
R2: RedRepFolk+Midnights123+1989LoverEver
R3: RedRepFolkMidnights1231989LoverEver+DebFearSpeak
Before removing all the paper, use the paper side as guidance to fuse all the facial features appliqués. After sashing, add the letters, if you used white fabric, you can lay the paper template underneath to guide you, though you may have to trace the mirrored letters first.
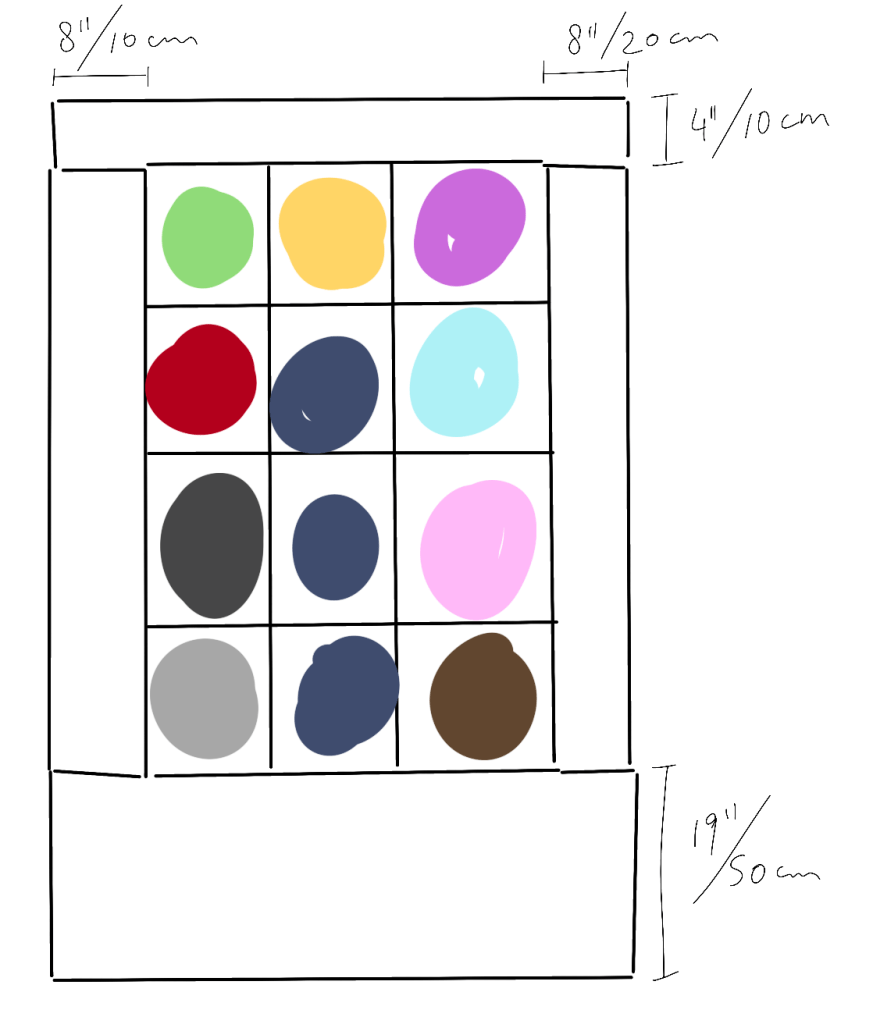
I have minimal advice on sashing due to a little too much improvising. This is what I did: Add white borders on the sides first (width 8”/20cm), then a thin border on top (width 4”/10cm) and a big piece at the bottom (width 19”/50cm). This is a lot, but gives some breathing room for sandwiching and cutting.
After quilting, cut down the sashing to your preference, taking binding width into account.
Refer to my Youtube video to see how I finished my quilt, but here’s the TLDR: After sandwiching, I recommend quilting the outlines of the blocks, the letters and the facial features (if the appliques are only fused and not stitched yet) afterwards. I personally went for stitch in a ditch and quilted my quilt quite minimally. I used a dense zig-zag stitch to create borders for the blocks, skipping over the parts where Midnights spills over to the other blocks.
End
I really, really hope this pattern is clear enough to get you ‘till the end! Again, feel free to ask me to clarify things. Can’t wait to see your quilts.
